Go
Setup Go Development Environment with VS Code and WSL on Windows
Prerequisites
Your PC should be running a newer version of Windows 10 which supports WSL. Check WSL’s documentation for detail.
Setup WSL
Enable WSL Feature
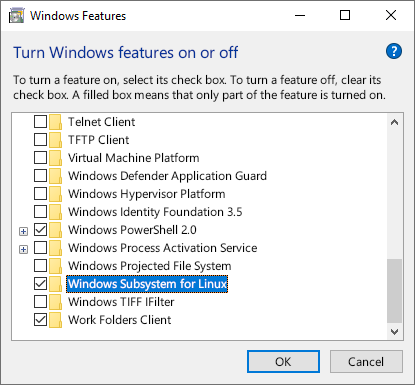
First of all, the WSL feature should be turned on. Open the Start Menu, search for and open “Turn Windows features on or off”. Enable “Windows Subsystem for Linux” and click OK. The system may reboot several times.

Install a WSL Distro
After the reboot is finished, open Microsoft Store and search for “Linux”. You should see a big banner with a “Get the apps” button on it. Click it. Then you will see all the Linux distros that are supported to run with WSL. Select the one that you are most familiar with or you love, then install it.
I’m using Ubuntu 18.04 LTS as I’ve used it for the most.
Terminal (Optional)
WSL uses Windows Console Host (conhost) by default. Search for your distro name (e.g. “Linux”) in the Start Menu to run it. It’s usable, though it’s a little too simple (or shabby) and there’s not too much to customize.
However, as Terminus’s made with Electron and it renders with GPU, it’s a bit more energy-hungry than the traditional native terminal emulators. There’s a list of terminals that work well with WSL. You can select any one you like. https://github.com/sirredbeard/Awesome-WSL#terminals
If your terminal cannot locate the home dir of the Linux distro (often it’s in something like /mnt/c/Users/<name>, a simple workaround is to use C:\WINDOWS\system32\wsl.exe ~ as your custom shell. The trailing ~ gets you to the home dir. See https://github.com/microsoft/WSL/issues/1346
Install Go in WSL
Install a Binary Release
Sometimes the distro-provided Go is outdated, or you may need a specific version.
Download from Go’s website https://golang.org/dl/ and follow the installation guide https://golang.org/doc/install.
For example I’m installing the latest version (1.14.4) at this time:
wget https://dl.google.com/go/go1.14.4.linux-amd64.tar.gz
sudo tar -C /usr/local -xzf go1.14.4.linux-amd64.tar.gz
Then edit environment variables in the shell’s config file, e.g. ~/.bash_profile for bash.
export GOPATH="$HOME/go" # or any directory to put your Go code
export PATH="$PATH:/usr/local/go/bin:$GOPATH/bin"
Configure VS Code
Install the Remote Development Extension
Setup up VS Code is easy. First, install the remote dev extension. If you only use WSL, the Remote — WSL extension is all you need.
https://marketplace.visualstudio.com/items?itemName=ms-vscode-remote.remote-wsl
Otherwise you may consider the full Remote Development Extension Pack.
https://marketplace.visualstudio.com/items?itemName=ms-vscode-remote.vscode-remote-extensionpack
Enter Remote Dev Environment
After the remote extension is installed, you will see a colored button in the left-bottom corner of VS Code, named “Open a remote window”. Click it and select “Remote-WSL: New Window” to open a window with remote environment enabled. Some setup work will be done now and you should see the progress in the right-bottom corner.
Setup the Go Extension
Then you need to setup the Go extension for the remote dev env. Here’s something different if you are new to remote development in VS Code. The VS Code environment is divided into two parts with the remote dev extension installed, which are the local part and the remote part, both including their own extensions and tools. Some extensions, specifically workspace extensions (as opposed to UI extensions), should be installed remotely to use in remote development.
If you are a new user of the Go extension, it will be installed remotely automatically in the remote env. Or if you have installed it locally before, you will see a “Install on WSL” button on the Go extension. Click it to make it available in the remote env, and you should be prompted to reload the window.
Install Go Tools
Go tools must be installed to use the functionalities of the extension. Use the “Go: Install/Update Tools” command in VS Code, or open the WSL shell and install manually following the guide.
https://github.com/golang/vscode-go/blob/master/docs/tools.md
Configure the remote Go extension
The Go extension should be re-configured remotely to work properly. Open the VS Code settings, you will see a new “Remote (WSL)” tab on the top. Config the Go extension here.
Or you can edit the JSON config file directly. Normally it’s located in the WSL at ~/.vscode-server/data/Machine/settings.json.
Important: GOPATH and GOROOT must be set for the remote Go extension, as it does not know where to read the environment variables you’ve set in your shell configs.
Below is my extension config for reference.
{
    "terminal.integrated.shell.linux": "/usr/bin/zsh",
    "go.gopath": "/home/beta/Coding/Go",
    "go.goroot": "/usr/local/go",
    "go.formatTool": "goformat",
    "go.autocompleteUnimportedPackages": true,
    "[go]": {
        "editor.formatOnSave": true,
        "editor.codeActionsOnSave": {
            "source.organizeImports": true
        }
    }
}
Now you’ve setup a fully working Go development environment with VS Code and WSL.