Kubernetes Role Based Access Control RBAC
What is RBAC and why do I need it?
Role based access control RBAC in Kubernetes can be used to define fine-grained permissions in Kubernetes clusters.
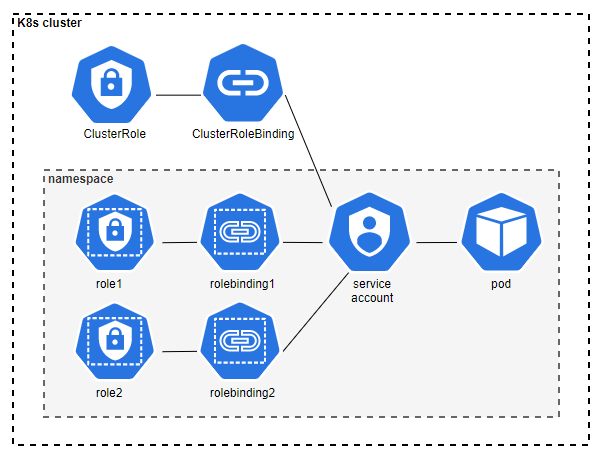
So, how does RBAC work exactly? Let’s do a quick revision.
Step 1 — Define a role (Role or ClusterRole) with permissions
- A Role exists in the Kubernetes namespace it was created, and can give access to resources in this namespace.
- A ClusterRole exists outside a Kubernetes namespace, and can give access to resources in different namespaces and to cluster-scoped resources.
Step 2 — Create a service account, or use an existing user or group
Service accounts are Kubernetes objects, which can be created and managed in Kubernetes. Every pod has a service account assigned. As soon as the pod is started, the Service account token is mounted inside the pod, which can then be used to communicate with the kube-apiserver. Users and groups are not Kubernetes objects, and have to be managed outside of Kubernetes.
Step 3: Bind one or more roles to the service account, user or group
A RoleBinding is used to bind a Role to a user or a service account. A RoleBinding exists in the same namespace like the Role it binds. RoleBindings can also bind a ClusterRole. In that case, the permissions granted by the ClusterRole are valid in the namespace the RoleBinding exists. A ClusterRolesBinding is used, if the permissions defined in the ClusterRole should be valid for all namespaces. Now you know how RBAC works. So far so easy, right? But let’s discuss this in more detail, because there is more to it than what meets the eye.
Additional information about RBAC can be found on the official Kubernetes documentation:
Recommendations for using RBAC
Less is more — ensure least privileges
The most important point to consider in regard to RBAC is least privilege. Every service account or user should only have the minimum rights needed for the job to be done.
This is especially true for permissions to manage Kubernetes secrets, and for permissions to create new pods (which enables access to secrets, but this is another story).
Also be very careful when you assign a ClusterRole with a ClusterRoleBinding to a pod, because this way, you give the pod permissions in every namespace in the whole cluster.
Check permissions
To check the defined permissions, you can use the following tools:
- To check if a specific user or service account has a specific permission, use the Kubernetes native tool kubectl auth can-i
- Example: check if service account “demo-sa” from namespace “demo” has the right to get secrets in the namespace “demo”
$ kubectl auth can-i get secrets -n demo --as=system:serviceaccount:demo:demo-sa
yes
- To check who has a specific permission, use the tool kubectl-who-can from Aqua Security
- Example: check which service accounts, users or groups can get secrets in the namespace “demo”
$ kubectl who-can get secrets -n demo
ROLEBINDING                    NAMESPACE  SUBJECT    TYPE            SA-NAMESPACE
rb-role-read-secret-demo-sa-1  demo       demo-sa-1  ServiceAccount  demo
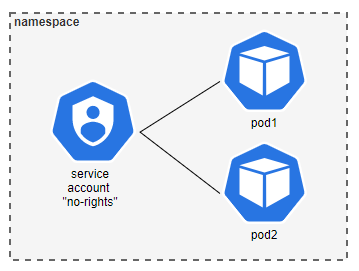
Why the default service account is not your friend
What happens, if you do not define a service account for your pod? Then the default service account in the namespace where the pod exists is assigned automatically. No problem, right?
Now you need some rights in the Kubernetes cluster, so you bind a role to the default service account. Still no harm done.
But what happens, if someone else creates a new pod in the same namespace, without defining a dedicated service account? The new pod also gets the default service account assigned, and by doing so, all the rights from the role that is bound to it. And that is a problem.
So do not use the default service account. Instead create a dedicated service account for pods that need to have permissions in the Kubernetes cluster.
Service Account example:
service_account.yaml
apiVersion: v1
kind: ServiceAccount
metadata:
  name: demo-sa
  namespace: demo
No rights needed in the Kubernetes cluster
If you have one or more pods that do not need to access the kube-apiserver, and you are sure that this will not change in the future, you can do the following.
We already talked about not using the default service account, and this is also true if your pod does not need access to the kube-apiserver. So instead of using the default service account, create one dedicated service account, which you can assign to all pods that do not need to access the kube-apiserver.
*The recommendation for pods that need to access the kube-apiserver is still, to create a dedicated service account for every pod.
Then disable automounting of the service account token.
You can disable automounting of a service account token either in the service account specification, or in the pod specification. If you specify different automountServiceAccountToken values in the service account specification and the pod specification, the pod specification takes precedence.
- Disable automounting of a service account token for a service account:
disable_automounting_for_sa.yaml
apiVersion: v1
kind: ServiceAccount
metadata:
  name: no-access-sa
automountServiceAccountToken: false
- Disable automounting of a service account token for a pod:
disable_automounting_for_pod.yaml
apiVersion: v1
kind: Pod
metadata:
  name: test-pod
spec:
  serviceAccountName: no-access-sa
  automountServiceAccountToken: false
Role definition best practices
Now we have discussed some important points in regard the RBAC. But there is still one missing: the best way to define roles.
Names are important
The fist recommendation is to give the role a well designed name, which makes it very obvious what the role is used for.
- E.g. a role that should be able to read secrets, could be named — now please guess what I am going to say — yes, you are right: “read-secrets”. I think you get the point.
Define roles for different permissions, not for different service accounts
The second recommendation is to define roles, and bind all needed roles to a service account, instead of creating one role for every service account.
Let us illustrate this with the following example:
- We want to give two pods the right to get information about other pods and one of the pods the get secrets. The service account of the first pod is “sa1”, and the service account of the second pod is “sa2”.
- First, we create the roles “read-pod” and “read-secret”:
read_pod_role.yaml
apiVersion: rbac.authorization.k8s.io/v1
kind: Role
metadata:
  name: read-pod
  namespace: demo
rules:
  - apiGroups: [""]
    resources: ["pods"]
    verbs: ["get", "watch", "list"]
read_secret_role.yaml
apiVersion: rbac.authorization.k8s.io/v1
kind: Role
metadata:
  name: read-secret
  namespace: demo
rules:
  - apiGroups: [""]
    resources: ["secrets"]
    verbs: ["get", "watch", "list"]
- Then we bind the role “read-pods” to both service accounts (sa1 and sa2) and bind the role “read-secret” to the second service account (sa2):
read_pod_rolebinding.yaml
apiVersion: rbac.authorization.k8s.io/v1
kind: RoleBinding
metadata:
  name: read-pod
  namespace: demo
subjects:
  - kind: ServiceAccount
    name: sa1
    namespace: demo
  - kind: ServiceAccount
    name: sa2
    namespace: demo
roleRef:
  kind: Role
  name: read-pod
  apiGroup: rbac.authorization.k8s.io
read_secret_rolebinding.yaml
apiVersion: rbac.authorization.k8s.io/v1
kind: RoleBinding
metadata:
  name: read-secret
  namespace: demo
subjects:
  - kind: ServiceAccount
    name: sa2
    namespace: demo
roleRef:
  kind: Role
  name: read-secret
  apiGroup: rbac.authorization.k8s.io
In the end we check the permissions of the two service accounts:
kubectl auth can-i get pods -n demo --as=system:serviceaccount:demo:sa1
yes
kubectl auth can-i get secrets -n demo --as=system:serviceaccount:demo:sa1
no
kubectl auth can-i get pods -n demo --as=system:serviceaccount:demo:sa2
yes
kubectl auth can-i get secrets -n demo --as=system:serviceaccount:demo:sa2
yes
Summary
In this blog post we discussed what has to be considered when using RBAC in Kubernetes. We talked about the following:
- Ensure least privilege by giving every service account or user only the minimum rights needed for the job to be done.
- Do not use the default service account, instead define a dedicated service account for each of your pods that need to access the kube-apiserver.
- If your pods do not need to access the kube-apiserver, define a service account for these pods and disable automounting of the service account token.
- Create roles with well-defined names.
- Define roles for different permissions, not for different service accounts. When you follow the recommendations on this page, you have done an important first step towards a secure Kubernetes cluster.
Source:
https://engineering.dynatrace.com/blog/kubernetes-security-part-1-role-based-access-control-rbac/